
If you’re wrestling with Windows 10 machines that just won’t budge to Windows 11 before the support deadline, you’re in the right place. I’ve spent the past few years helping organization of various sizes tackle this exact challenge, and with Windows 10’s end-of-support looming just months away (October 2025, anyone?), getting those systems upgraded to Windows 11 is non-negotiable.
Microsoft Intune’s Autopatch is a game-changer for this, but it’s not without its quirks. Let’s dive into my battle-tested toolkit to get your endpoints upgraded smoothly, drawing from real-world experience and Microsoft’s hefty documentation.
Why Intune Autopatch?
Intune’s update engine is top-notch for in-place upgrades, offering detailed reporting on machine compatibility, health risks, and feature update statuses. But let’s be real—sometimes those endpoints just refuse to cooperate. Over the past few years, I’ve seen it all: registry conflicts, third-party interference, and machines that seem to be on permanent vacation. This guide will walk you through setting up a robust Autopatch strategy to push those stubborn Windows 10 devices to Windows 11, complete with dynamic groups, targeted policies, and remediation scripts.
Step 1: Laying the Foundation for Autopatch
Before we get to the fun stuff, we need to lay the groundwork. Dynamic groups in Microsoft Entra are your best friend for zero-touch device management. They eliminate manual tinkering and keep things scalable.
Create a Dynamic Device Group
First, head to Entra and create a dynamic device group targeting all Windows 10 machines. This group will automatically include Windows 10 devices and release them once they’re upgraded to Windows 11. Here’s the syntax you’ll need:
(device.deviceOSVersion -startsWith "10.0.1")

Configure Your Autopatch Group
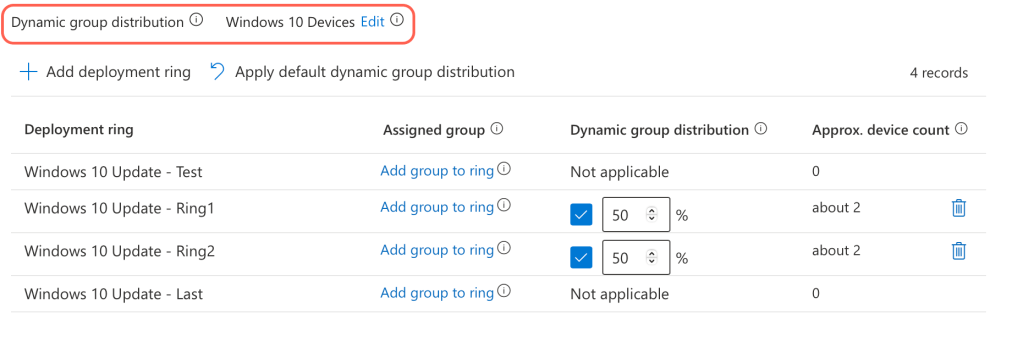
Next, set up a new Autopatch group in Intune. Assign your Windows 10 dynamic group to it and decide how many update rings you want. I recommend two rings for a staggered rollout to keep things manageable. Set the target feature release to Windows 10 for now—this baselines your machines for cleaner reporting.
Pro Tip: If you already have an existing Autopatch policy for your Windows 10 endpoints, create a new ring and directly assign your Windows 10 dynamic group to it. Direct ring assignments override dynamic ring distributions.
On the next pages you will be instructed to set your Autopatch update settings and release schedules. First select, at minimum, quality, feature and driver updates; you can include or exclude the other Microsoft products – I personally enable all of them!
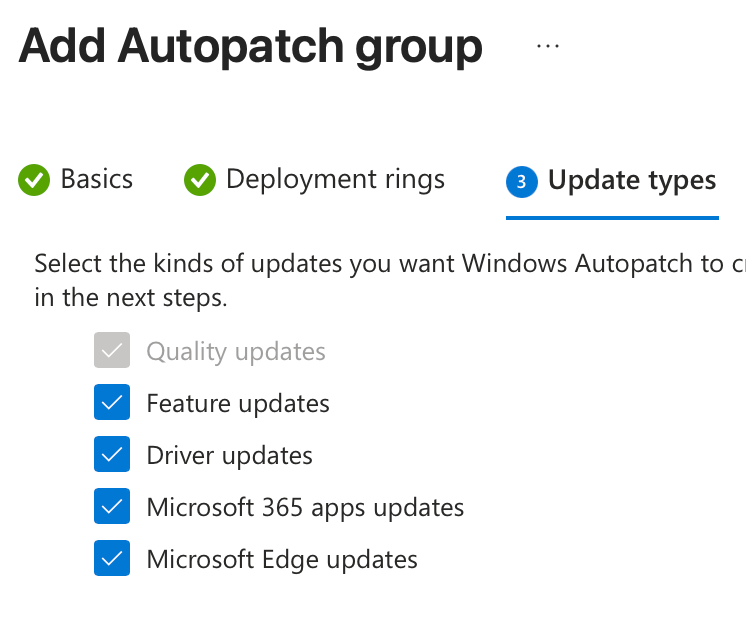
Secondly, select your feature update as Windows 10, version 22H2 – we will be using this to stabilize and schedule the feature releases more accurately. If this is set to a Windows 11 release the endpoints could upgrade out-of-bands.

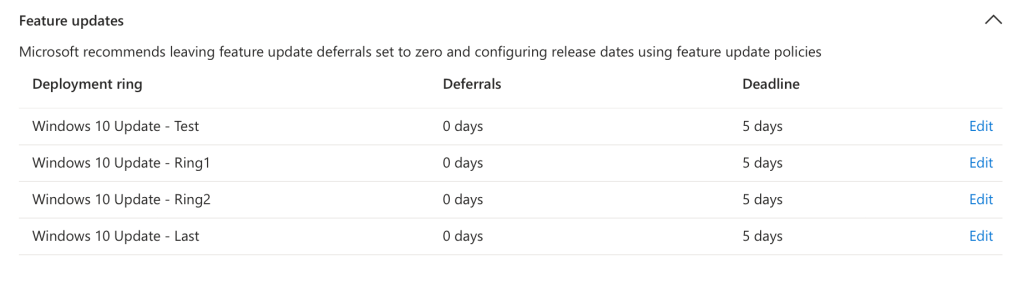
Next, review your rings and choose the release schedule that works for your organization; it is imperative that you configure the following settings for feature update deferrals as “0 days” in Autopatch, otherwise the feature update may not install when scheduled. We will be scheduling the release date later in this post.
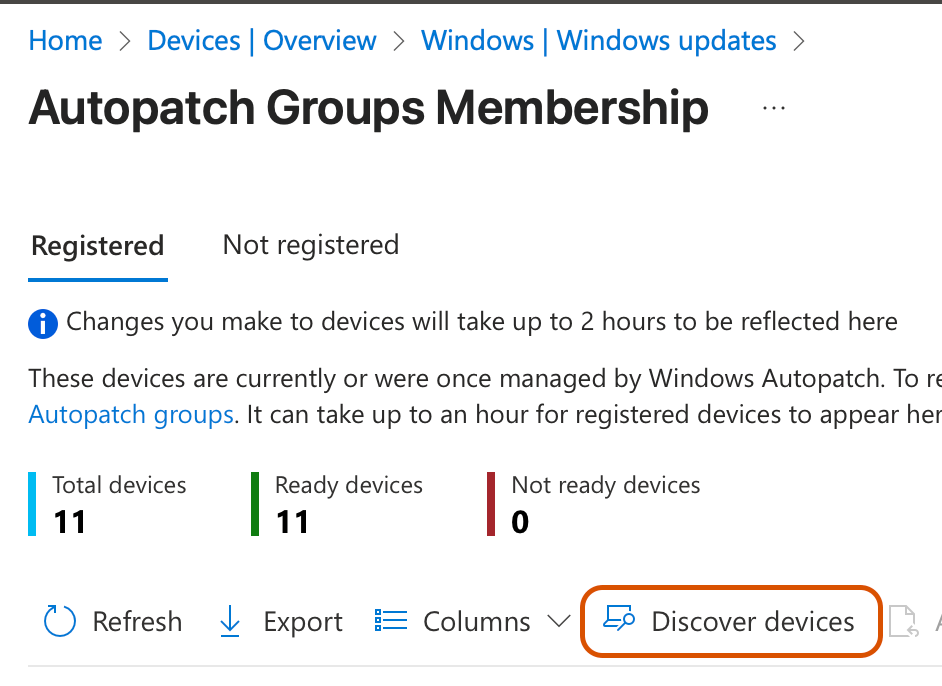
Once you have saved your baseline Autopatch group, head over to the Autopatch dashboard and click on “Discover Devices” to migrate the Windows 10 devices to Autopatch.
Lastly, manually navigate into your Autopatch Update Rings (nested under the parent policy) and modify the settings for “Upgrade Windows 10 devices to Latest Windows 11 release” – Yes

Exclude Your Autopatch Group from Existing Update Policies
Exclude the Autopatch “Parent” Entra Group (Intune automatically creates and manages this group) from any existing update rings, feature releases, or driver policies – devices can only belong to one policy.
Step 2: Detection and Remediation Scripts
Remediation 1: Intune Feature Appraisal
Here’s where things get tricky. If a device already has a feature update policy applied, assigning a new one can cause endpoints to get stuck due to orphaned registry keys from previous updates. I’ve seen this issue spike recently, where machines can’t write to registry locations after a new policy is applied. Bellow is the first remediation that you will need to stage to resolve this problem:
# Define the registry key path
$regKeyPath = "HKLM:\SOFTWARE\Microsoft\Windows NT\CurrentVersion\AppCompatFlags\TargetVersionUpgradeExperienceIndicators"

# Check if the registry key exists and delete it if it does
if (Test-Path $regKeyPath) {
    Remove-Item -Path $regKeyPath -Recurse -Force
    Write-Output "Registry key deleted."
} else {
    Write-Output "Registry key does not exist."
}

# Run the specified command
# Note: The executable is typically named CompatTelRunner.exe (case-sensitive file system consideration)
Start-Process -FilePath "C:\Windows\System32\CompatTelRunner.exe" -ArgumentList "-m:appraiser.dll -f:DoScheduledTelemetryRun" -NoNewWindow -Wait
Write-Output "Command executed."
Remediation 2: Third-Party Registry Conflicts
Third-party patch management tools—like MSPs’ RMM platforms, old GPO Windows Update policies, or custom scripts—can wreak havoc on Intune’s update engine. I’ve even seen brand-new Intune-enrolled machines with conflicting registry values for no apparent reason (looking at you, August 2025 patches). These often involve feature update deferrals that linger past their intended release – so because of this we will use the following script to remediate the needed registry keys.
*Edit* – MAJOR thank you to Emanuel for providing the source of the PowerShell syntax – we have removed some additional lines to prevent resetting the SoftwareDistribution cache. Source: https://www.reddit.com/r/Intune/comments/1i6ncns/windows_update_remediation_v2/
$ErrorActionPreference = "SilentlyContinue"
#Run DISM
try {Repair-WindowsImage -RestoreHealth -NoRestart -Online -LogPath "C:\ProgramData\Microsoft\IntuneManagementExtension\Logs\#DISM.log" -Verbose -ErrorAction SilentlyContinue}
catch {Write-Output "DISM error occurred. Check logs"}
finally {
        #Check registry for pauses
        $Path = "HKLM:\SOFTWARE\Policies\Microsoft\Windows\WindowsUpdate"
        $TestPath = Test-Path $Path
        if  ($TestPath -eq $true)
            {
            Write-Output "Deleting $Path"
            Remove-Item -Path $Path -Recurse -Verbose
            }

        #Check registry for pauses
        $Path2 = "HKLM:\SOFTWARE\Microsoft\CloudManagedUpdate"
        $TestPath = Test-Path $Path2
        if  ($TestPath -eq $true)
            {
            Write-Output "Deleting $Path2"
            Remove-Item -Path $Path2 -Recurse -Verbose
            }

        #Check registry for pauses
        $Path3 = "HKLM:\SOFTWARE\Microsoft\WindowsUpdate\UpdatePolicy"
        $TestPath = Test-Path $Path3
        if  ($TestPath -eq $true)
            {
            Write-Output "Deleting $Path3"
            Remove-Item -Path $Path3 -Recurse -Verbose
            }

        $key = "HKLM:\SOFTWARE\Microsoft\WindowsUpdate\UpdatePolicy\Settings"
        $TestKey = Test-Path $key
        if  ($TestKey -eq $true)
            {
            $val = (Get-Item $key -EA Ignore);
            $PausedQualityDate = (Get-Item $key -EA Ignore).Property -contains "PausedQualityDate"
            $PausedFeatureDate = (Get-Item $key -EA Ignore).Property -contains "PausedFeatureDate"
            $PausedQualityStatus = (Get-Item $key -EA Ignore).Property -contains "PausedQualityStatus"
            $PausedQualityStatusValue = $val.GetValue("PausedQualityStatus");
            $PausedFeatureStatus = (Get-Item $key -EA Ignore).Property -contains "PausedFeatureStatus"
            $PausedFeatureStatusValue = $val.GetValue("PausedFeatureStatus");

            if  ($PausedQualityDate -eq $true)
                {
                Write-Output "PausedQualityDate under $key present"
                Remove-ItemProperty -Path $key -Name "PausedQualityDate" -Verbose -ErrorAction SilentlyContinue
                $PausedQualityDate = (Get-Item $key -EA Ignore).Property -contains "PausedQualityDate"
                }

            if  ($PausedFeatureDate -eq $true)
                {
                Write-Output "PausedFeatureDate under $key present"
                Remove-ItemProperty -Path $key -Name "PausedFeatureDate" -Verbose -ErrorAction SilentlyContinue
                $PausedFeatureDate = (Get-Item $key -EA Ignore).Property -contains "PausedFeatureDate"
                }

            if  ($PausedQualityStatus -eq $true)
                {
                Write-Output "PausedQualityStatus under $key present"
                Write-Output "Currently set to $PausedQualityStatusValue"
                if  ($PausedQualityStatusValue -ne "0")
                    {
                    Set-ItemProperty -Path $key -Name "PausedQualityStatus" -Value "0" -Verbose
                    $PausedQualityStatusValue = $val.GetValue("PausedQualityStatus");
                    }
                }

            if  ($PausedFeatureStatus -eq $true)
                {
                Write-Output "PausedFeatureStatus under $key present"
                Write-Output "Currently set to $PausedFeatureStatusValue"
                if  ($PausedFeatureStatusValue -ne "0")
                    {
                    Set-ItemProperty -Path $key -Name "PausedFeatureStatus" -Value "0" -Verbose
                    $PausedFeatureStatusValue = $val.GetValue("PausedFeatureStatus");
                    }
                }
            }

        $key2 = "HKLM:\SOFTWARE\Microsoft\PolicyManager\current\device\Update"
        $TestKey2 = Test-Path $key2
        if  ($TestKey2 -eq $true)
            {
            $val2 = (Get-Item $key2 -EA Ignore);

            $PauseQualityUpdatesStartTime = (Get-Item $key2 -EA Ignore).Property -contains "PauseQualityUpdatesStartTime"
            $PauseFeatureUpdatesStartTime = (Get-Item $key2 -EA Ignore).Property -contains "PauseFeatureUpdatesStartTime"
            $PauseQualityUpdates = (Get-Item $key2 -EA Ignore).Property -contains "PauseQualityUpdates"
            $PauseQualityUpdatesValue = $val2.GetValue("PauseQualityUpdates");
            $PauseFeatureUpdates = (Get-Item $key2 -EA Ignore).Property -contains "PauseFeatureUpdates"
            $PauseFeatureUpdatesValue = $val2.GetValue("PauseFeatureUpdates");
            $DeferFeatureUpdates = (Get-Item $key2 -EA Ignore).Property -contains "DeferFeatureUpdatesPeriodInDays"
            $DeferFeatureUpdatesValue = $val2.GetValue("DeferFeatureUpdatesPeriodInDays");

            if  ($DeferFeatureUpdates -eq $true)
                {
                Write-Output "DeferFeatureUpdatesPeriodInDays under $key2 present"
                Write-Output "Currently set to $DeferFeatureUpdatesValue"
                if  ($DeferFeatureUpdatesValue -ne "0")
                    {
                    Set-ItemProperty -Path $key2 -Name "DeferFeatureUpdatesPeriodInDays" -Value "0" -Verbose
                    $DeferFeatureUpdatesValue = $val2.GetValue("DeferFeatureUpdatesPeriodInDays");
                    }
                }

            if  ($PauseQualityUpdatesStartTime -eq $true)
                {
                Write-Output "PauseQualityUpdatesStartTime under $key2 present"
                Remove-ItemProperty -Path $key2 -Name "PauseQualityUpdatesStartTime" -Verbose -ErrorAction SilentlyContinue
                Remove-ItemProperty -Path $key2 -Name "PauseQualityUpdatesStartTime_ProviderSet" -Verbose -ErrorAction SilentlyContinue
                Remove-ItemProperty -Path $key2 -Name "PauseQualityUpdatesStartTime_WinningProvider" -Verbose -ErrorAction SilentlyContinue
                $PauseQualityUpdatesStartTime = (Get-Item $key2 -EA Ignore).Property -contains "PauseQualityUpdatesStartTime"
                }

            if  ($PauseFeatureUpdatesStartTime -eq $true)
                {
                Write-Output "PauseFeatureUpdatesStartTime under $key2 present"
                Remove-ItemProperty -Path $key2 -Name "PauseFeatureUpdatesStartTime" -Verbose -ErrorAction SilentlyContinue
                Remove-ItemProperty -Path $key2 -Name "PauseFeatureUpdatesStartTime_ProviderSet" -Verbose -ErrorAction SilentlyContinue
                Remove-ItemProperty -Path $key2 -Name "PauseFeatureUpdatesStartTime_WinningProvider" -Verbose -ErrorAction SilentlyContinue
                $PauseFeatureUpdatesStartTime = (Get-Item $key2 -EA Ignore).Property -contains "PauseFeatureUpdatesStartTime"
                }

            if  ($PauseQualityUpdates -eq $true)
                {
                Write-Output "PauseQualityUpdates under $key2 present"
                Write-Output "Currently set to $PauseQualityUpdatesValue"
                if  ($PauseQualityUpdatesValue -ne "0")
                    {
                    Set-ItemProperty -Path $key2 -Name "PauseQualityUpdates" -Value "0" -Verbose
                    $PauseQualityUpdatesValue = $val2.GetValue("PauseQualityUpdates");
                    }
                }

            if  ($PauseFeatureUpdates -eq $true)
                {
                Write-Output "PauseFeatureUpdates under $key2 present"
                Write-Output "Currently set to $PauseFeatureUpdatesValue"
                if  ($PauseFeatureUpdatesValue -ne "0")
                    {
                    Set-ItemProperty -Path $key2 -Name "PauseFeatureUpdates" -Value "0" -Verbose
                    $PauseFeatureUpdatesValue = $val2.GetValue("PauseFeatureUpdates");
                    }
                }
            }

        $key3 = "HKLM:\SOFTWARE\Policies\Microsoft\Windows\DataCollection"
        $TestKey3 = Test-Path $key3
        if  ($TestKey3 -eq $true)
            {
            $val3 = (Get-Item $key3 -EA Ignore);

            $AllowDeviceNameInTelemetry = (Get-Item $key3 -EA Ignore).Property -contains "AllowDeviceNameInTelemetry"
            $AllowTelemetry_PolicyManager = (Get-Item $key3 -EA Ignore).Property -contains "AllowTelemetry_PolicyManager"
            $AllowDeviceNameInTelemetryValue = $val3.GetValue("AllowDeviceNameInTelemetry");
            $AllowTelemetry_PolicyManagerValue = $val3.GetValue("AllowTelemetry_PolicyManager");

            if  ($AllowDeviceNameInTelemetry -eq $true)
                {
                Write-Output "AllowDeviceNameInTelemetry under $key3 present"
                Write-Output "Currently set to $AllowDeviceNameInTelemetryValue"
                }
            else{New-ItemProperty -Path $key3 -PropertyType DWORD -Name "AllowDeviceNameInTelemetry" -Value "1" -Verbose}

            if  ($AllowDeviceNameInTelemetryValue -ne "1")
                {Set-ItemProperty -Path $key3 -Name "AllowDeviceNameInTelemetry" -Value "1" -Verbose}

            if  ($AllowTelemetry_PolicyManager -eq $true)
                {
                Write-Output "AllowTelemetry_PolicyManager under $key3 present"
                Write-Output "Currently set to $AllowTelemetry_PolicyManagerValue"
                }
            else{New-ItemProperty -Path $key3 -PropertyType DWORD -Name "AllowTelemetry_PolicyManager" -Value "1" -Verbose}

            if  ($AllowTelemetry_PolicyManagerValue -ne "1")
                {Set-ItemProperty -Path $key3 -Name "AllowTelemetry_PolicyManager" -Value "1" -Verbose}
            }


        $key4 = "HKLM:\SOFTWARE\Microsoft\Windows NT\CurrentVersion\AppCompatFlags\Appraiser\GWX"
        $TestKey4 = Test-Path $key4
        if  ($TestKey4 -eq $true)
            {
            $val4 = (Get-Item $key4 -EA Ignore);

            $GStatus = (Get-Item $key4 -EA Ignore).Property -contains "GStatus"
            $GStatusValue = $val4.GetValue("GStatus");

            if  ($GStatus -eq $true)
                {
                Write-Output "GStatus under $key4 present"
                Write-Output "Currently set to $GStatusValue"
                }
            else{New-ItemProperty -Path $key4 -PropertyType DWORD -Name "GStatus" -Value "2" -Verbose}

            if  ($GStatusValue -ne "2")
                {Set-ItemProperty -Path $key4 -Name "GStatus" -Value "2" -Verbose}
            }


}
Remediation 3: The Inactive Machine Problem
Microsoft’s fine print is clear: devices need to be online for 6-8 hours daily with 1-2 hours of activity to register updates properly. In my testing, many environments fail to simulate this check-in, especially if sleep settings aren’t managed.
Fix: A two-step approach:
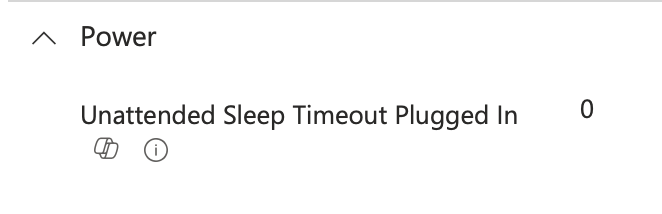
- Create a Settings Catalog configuration profile to prevent machines from sleeping when plugged in:
- Deploy a daily detection and remediation script to check for Windows updates, skipping machines with pending updates. Credit to Chander Mani Pandey – https://www.youtube.com/watch?v=vvx_rElKk8U
# Pre Check for Update status
$CheckForUpdatePre = Get-WinEvent -FilterHashtable @{
    LogName   = 'Microsoft-Windows-WindowsUpdateClient/Operational'
   }
$TopPre = $CheckForUpdatePre  | Select-Object -First 1

# Trigger Check for Windows update
Start-Process -FilePath "C:\Windows\System32\USOClient.exe" -ArgumentList "StartInteractiveScan" -WindowStyle Hidden
Start-Sleep 120

# Post Check for Update status
$CheckForUpdatePost = Get-WinEvent -FilterHashtable @{
    LogName   = 'Microsoft-Windows-WindowsUpdateClient/Operational'
    }
$TopPost = $CheckForUpdatePost | Select-Object -First 1

#OutPut
Write-host "PreCFU:-$($TopPre.TimeCreated) ; PostCFU:-$($TopPost.TimeCreated)"
I have added all of the needed detection and remediation scripts provided above on my GitHub – please feel free to download and use the raw files to stage within your Intune tenant!
https://github.com/kevinmalinoski/Intune-Blog-Resources/tree/main/Feature%20Update%20Tookit
Detection and remediation scripts through Intune allow you to schedule a recurrence after a set number of hours, or schedule the script daily for a particular time. I set most of my scripts to run every 12-24 hours to avoid machines being offline and missing the command for the scheduled time.
Step 3: Set Feature Release Schedules
To minimize disruption and ensure a smooth rollout, a multiphase release schedule for your Autopatch rings is the way to go. This approach lets you test updates on a smaller group before scaling to your entire fleet, catching issues early and keeping end users happy.
Set Phased Timelines
Schedule each ring with a staggered timeline to monitor progress and address issues for the feature update by creating a new Windows 11 Multi-Phase Release schedule:

This multiphase approach gives you control, flexibility, and confidence that your Windows 11 upgrades will roll out smoothly across your organization. Simply align the rings to the phase of the release and select your intended release date – below is an example of multiple scheduled phases:

Step 4: Locking in Autopatch for Success
Why am I so gung-ho about Autopatch? It’s the flexibility—driver updates, customizable grace periods for quality vs. feature updates, and better end-user experiences during major OS upgrades. This is critical when moving from Windows 10 to Windows 11, as driver updates often make or break the process.
Once your policies, dynamic group, and feature releases are set, you can sit back and let Intune to the heavy lifting over the next week. Please feel free to reach and share your experience applying this toolkit!
Conclusion: Keep It Simple, Keep It Effective
There’s no perfect way to manage Intune upgrades, but there’s a right way. The key is understanding the system’s design and avoiding overcomplicated scripts that mask the real issues. These steps and scripts have been refined over months of testing in real-world environments, tackling everything from registry conflicts to inactive devices.
Give your endpoints a reboot, allow 3-4 days for processing, and you’ll be over the Windows 10 hurdle in no time. With Windows 11 25H2 on the horizon, now’s the time to nail this upgrade and focus on the future.
Got insights or test results to share? Drop me a line at kevin@malinoski.me or reach out directly on LinkedIn —I’d love to hear how this works for you. Happy updating, and let’s conquer that Windows 11 migration together!

Leave a reply to Emanuel Cancel reply